One area where Kodi lags behind Plex is in how easy it is to share your media library on multiple devices. On Plex, the process is as simple as installing the appropriate app and entering your password. On Kodi, the process is much more convoluted. But, thankfully, convoluted doesn’t mean impossible.
There are actually two ways to sync or share your Kodi media library on multiple devices. You can either use Emby (the easy way) or MySQL (the hard way). In this article, we explain the easy way—because, well, why would you ever choose the more difficult option?
Using Emby to Sync Your Kodi Library
The easiest way to share your Kodi library with multiple devices is to use Emby.
In case you’re not aware, Emby is a competitor to Kodi and Plex. In many ways, it offers a happy compromise between its two big brothers; it has adopted Plex’s client-server model while remaining open source like Kodi.
To use Emby to sync your media library between devices, you’ll need to set up the Emby server app, install some additional plugins, and then install the Emby addon on Kodi.
How to Set Up an Emby Server
The first part of the process is to get your Emby server up and running. The server will become the backend for your media library, thus replacing the Kodi library database. Using the Emby backend will also sync a video’s watched status between devices.
To begin, head to the Emby website, click on the Download tab at the top of the page, and grab a copy of the app. Emby is available on Windows, Mac, and Linux, as well as NAS devices and the Docker containerization app. Indeed, it’s one of the best media servers you will find on Linux.
For maximum ease-of-setup, you should install the app on the same hard drive or storage location as your media files—though you can add network locations.
When you run Emby for the first time, you’ll need to work through the initial setup screens. Eventually, you will arrive at the Setup your media libraries screen.
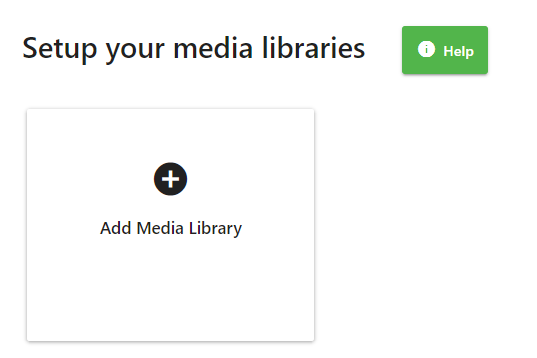
Click Add media library, give the library a name and choose the type of content, then pick the folders you want to include. You need to repeat this set for each individual library you want to create (for example, if you want three separate libraries for movies, TV shows, and music).
If you wish, scroll down the page to customize your library’s advanced settings. It’s worth ensuring Download artwork and metadata from the internet and Save artwork and metadata into media folders are both ticked. It’s not essential to make the app work, but some users have reported artwork and metadata issues in Kodi when they’re not.
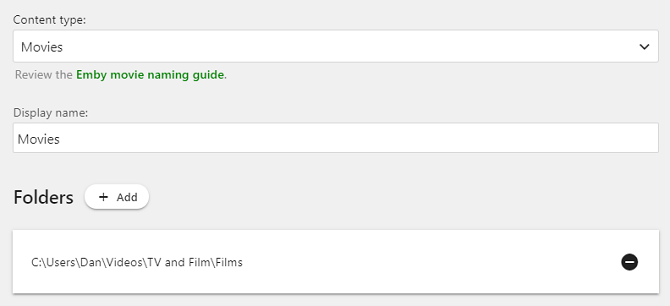
When you’re ready, click on OK, then click Next.
On the Configure Remote Access screen, make sure you tick the checkbox next to Allow remote connections to this Emby Server if you plan to use Kodi when you’re away from your home network.
Click Next one more time, agree to Emby’s terms of service, and you’re ready to move onto the next phase of the setup process.
Install Additional Emby Plugins
Before adding Emby to Kodi, you should take the time to install some additional plugins on your Emby server. They will help to make the Emby addon run faster and sync more thoroughly, thus giving you a more enjoyable user experience.
Here are the three plugins you should use:
1. Emby for Kodi Sync Queue
This is the most important plugin. Everyone following this guide should install it. It can keep track of events connected to Emby, even while Kodi is offline. As such, it lets the Emby addon for Kodi start much more quickly.
2. Auto-Box Set
If you’re a movie fanatic, install Auto-Box Set. It will automatically organize all movies in your Emby library into collections using data from themoviedb.org. The collections are automatically pulled into Kodi.
3. Trakt.tv
Any long-term Kodi user will be familiar with trakt.tv (we consider it an essential Plex plugin). It’s best described as Last.fm for videos. It will monitor what you’re watching and sync your series progress across all devices where the app is running. If you install Trakt.tv on Emby, make sure you disable any instances of the app running natively on Kodi.
Add the Emby Addon to Kodi
Installing the Emby plugin on Kodi uses the same process as any other plugin. You just need to make sure you add the dedicated Emby repo before you begin. Because it’s an official repo, it hasn’t been affected by the spate of recent closures; it’s NOT one of the Kodi repos you should avoid.
Download: Emby Repo for Kodi
Once you have a copy of the repo, launch Kodi. Then, from the Kodi homepage, go to System > Add-ons > Install from ZIP file.
Using the on-screen browser, locate and select the Emby repo ZIP file that you just downloaded. The addon will take a few minutes to install.
Before continuing, make sure the Emby server you installed earlier is running.
As soon as the repo has finished installing and you’ve confirmed Emby is running, return to the Kodi home screen. Now, navigate to System > Add-ons > Install from Repository > Kodi Emby. When the repo opens on your screen, go to Video Addons > Emby. Hit Install.
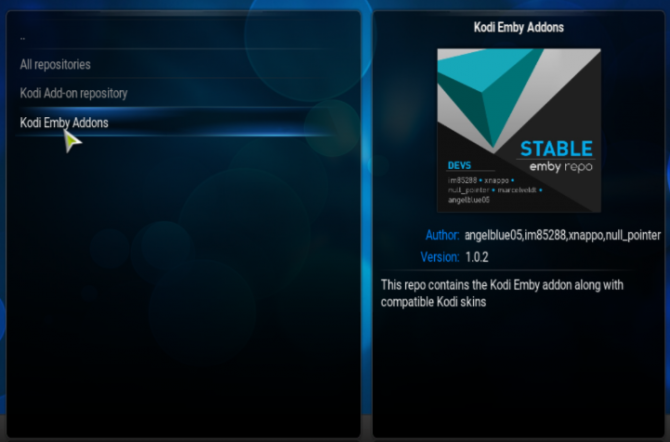
The Emby addon should automatically detect your Emby server and ask you for permission to connect to it. Click on Yes to agree.
To complete the initial setup, choose your Emby user from the dropdown menu.
You’ll now need to wait while Kodi scans and imports your Emby library. If your library is extensive, this might take a long time.
Next, you need to make one tweak in the addon’s settings. Go to System > Add-ons > My add-ons > Video add-ons > Emby > Configure and mark the checkbox next to Enable fast startup under Sync Options.
Finally, you need to add shortcuts to your various Emby libraries onto your Kodi homescreen. Emby and Kodi will create the shortcuts automatically; the shortcut will be tagged using the Emby library names. You will find them in your list of video nodes and playlists.
To add shortcuts to the Kodi homescreen, go to System > Appearance > Skin > Settings > Add-On Shortcuts.
Note: The process might vary if you’re using your own skin. For more information about installing repos, read our beginner’s guide to using Kodi.
Kodi With Emby Is Easier Than Using MySQL
The official way to sync and share your Kodi library on multiple devices is to use MySQL.
And while it works perfectly well, it’s incredibly complicated to set up, especially if you have no prior knowledge of MySQL. However, if you’d like to try the MySQL method for syncing and sharing your Kodi media library, you can follow the 10-page guide on the official Kodi wiki.
If you’re a Kodi beginner and just learning about this process for the first time, make sure you check out our list of essential Kodi tips for new users.
from MakeUseOf https://ift.tt/2JSfJML
via IFTTT

0 comments:
Post a Comment