If you’re using Photoshop for your design projects—creating logos, posters, infographics, or anything else—then you’ll need to know about typography.
Photoshop has a whole lot of tools for getting text onto your page, and making it look incredible. But where do you start?
In this short guide, we’ll walk you through everything you need to know about working with text in Photoshop.
Type Tool Basics in Photoshop
Before we get started, let’s do a quick overview of the absolute basics for working with text in Photoshop.
You add text to a document using one of the Type tools. You can select these in the Toolbar on the left edge of the screen, or by hitting T on your keyboard.
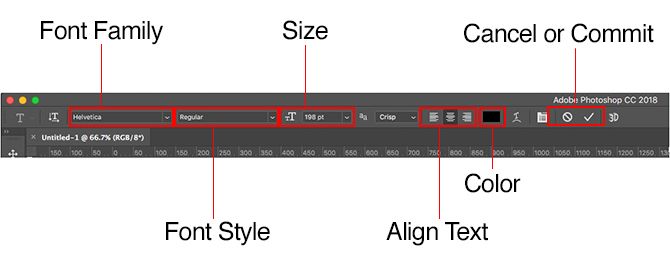
When you select this, the Type options will appear in the Options Bar at the top of the screen. The main ones are:
- Font Family: Select a font from those installed on your computer (or from Typekit)
- Font Style: Choose a style for your selected font, such as the Bold or Oblique versions
- Size: Set the point size for your type
- Align Text: Set the text to be left, right or center aligned
- Color: Choose a color for your text
- Cancel or Commit: Once you’ve added or edited text you must confirm to apply it to your canvas, or cancel to undo or remove it
Each item of text always goes on its own layer. To move or resize the text while editing hold down the Ctrl or Cmd key and drag it into place.
You can edit the text, or change font, size, and so on at any time. To do this select the Type tool and use the cursor to highlight the text, just as you would in a word processor. Don’t just select the text layer.
Creating Text for Titles and Headers
The main way most people add and edit text in Photoshop is to select the Horizontal Type Tool (or the Vertical one if you prefer), click on the canvas, then start typing.
This is the best option for titles, headers, or other short, single line pieces of text.
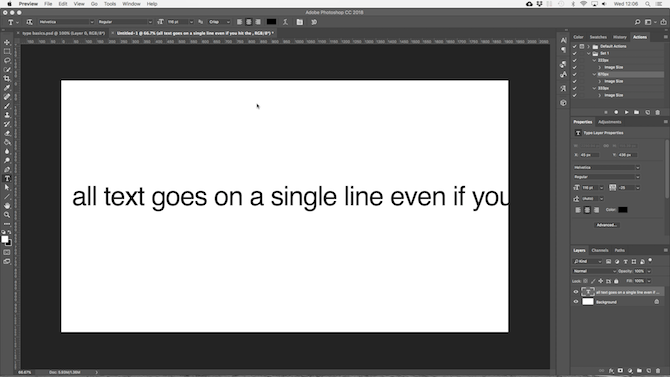
Clicking the canvas creates a text area that expands as you type. All the text goes on a single line, and never wraps to a new line. Even when you reach the edge of the canvas, the line will simply continue onto the pasteboard.
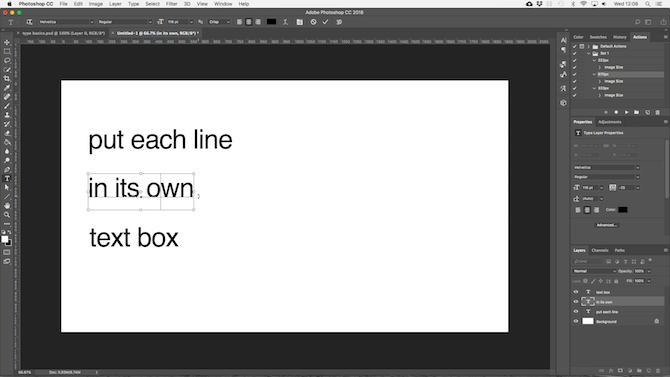
If you want to add line breaks, position the cursor and hit Enter. Better still, create separate text layers for each line in your header. That way you can control and position each one individually.
Working With Paragraph Text
For body copy—longer pieces of text like paragraphs or lists—create a text box first.
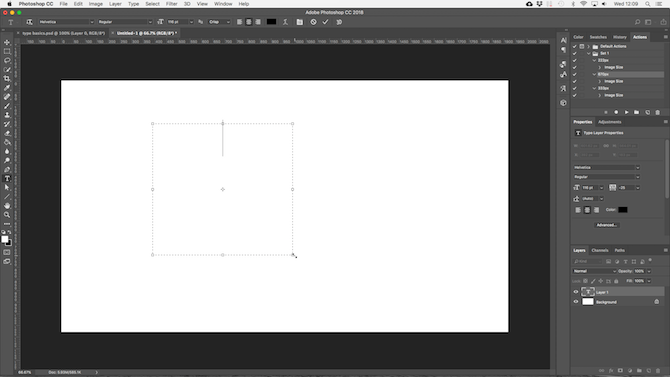
Select the Horizontal Type Tool and set your basic formatting options. Click and drag diagonally on the canvas to create a rectangular text box. Now type or paste your copy into the box.
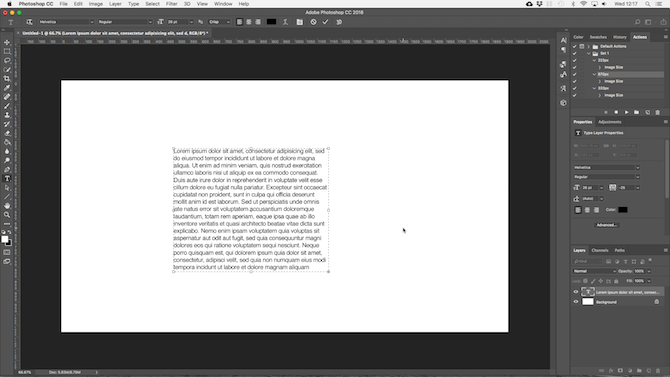
The text box is a fixed size. When text hits the right edge it wraps onto a new line. If the text is too long you need to resize the box to make the rest visible (or you can change the font size, of course).
Hit Ctrl + T (Windows) or Cmd + T (Mac) then hold Shift and drag one of the handlebars to make the box larger.
Creating Custom Text Box Shapes
You aren’t limited to working with rectangular text boxes. You can use various shape tools or draw new shapes manually with the Pen Tool, and then fill them with text.
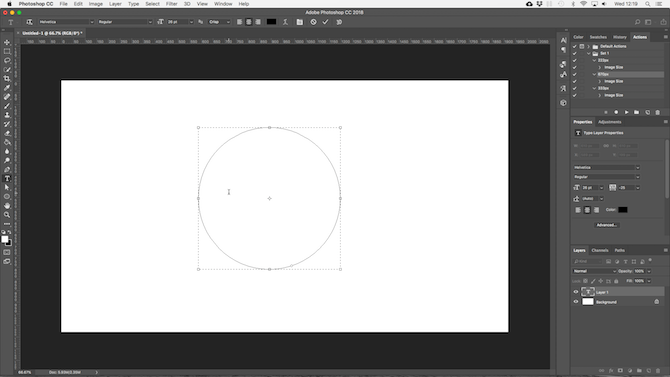
Select one of the Shape tools, or use the Pen Tool. Set the Tool Mode to Path in the top left corner of the Options Bar, then draw your shape on the canvas.
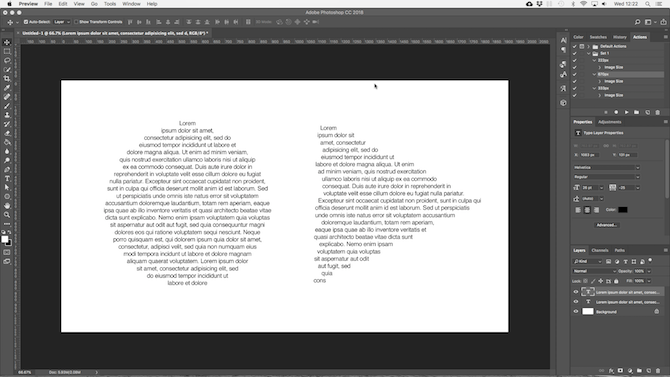
Now grab the Horizontal Type Tool and click inside the path you’ve drawn. This turns the shape into a text box. Now set the text alignment to Center, and type or paste your text into the box.
Custom shapes are useful when you need to wrap text around images or other objects in your design.
Placing Text on a Curve in Photoshop
You can also set your text to follow the line of a curve.
Start by selecting the Pen Tool. In the Options Bar at the top, set the Tool Mode to Path. Now draw a curve on the canvas. If you need a primer on this, check out our guide to using the Photoshop Pen Tool.

Next, select the Horizontal Type Tool. Hover the cursor over the path you’ve just drawn. When the cursor turns into a wavy line, click. This anchors a text box to the path.
Now type your text.
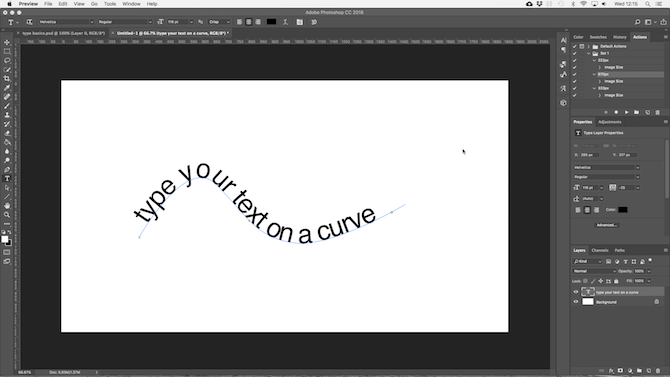
You can also set your text to follow the outline of a shape. The process is the same, only you select one of the Shape tools instead of the Pen. Again, be sure to set the Tool Mode to Path before you draw it.
To adjust the position of the text on the curve, use the Direct Selection Tool. Hover the mouse pointer over the text and it will turn into a cursor with two arrows. Click and drag along the line to shunt the text along the line.
Click and drag across the line to set whether the text should run inside or outside the shape.
Masking Text in Photoshop
The last of Photoshop’s main text tools are the Horizontal Type Mask Tool and Vertical Type Mask Tool.
These tools don’t place text on the canvas. Instead, they create text-based shapes that you can use in your designs. Because of this it’s important that you choose the right font before you start. You can’t go back and edit it later.
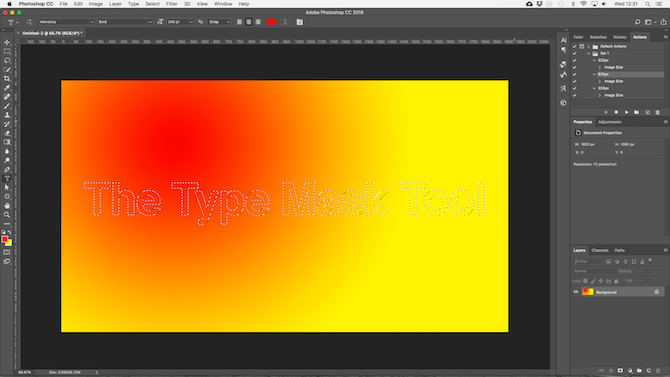
Start by opening an image in Photoshop, or choosing a layer that contains some color.
Select one of the Type Mask tools and set your font. Now click on the canvas and start typing. When you hit the Commit button your text will turn into a selection.
Here are three ways to use it:
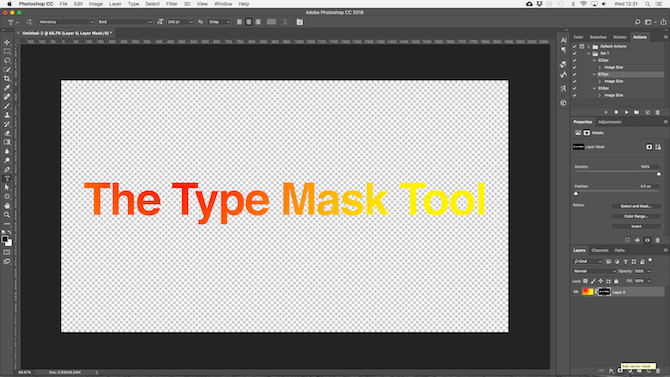
Add a texture to your text. Click the Add Layer Mask button at the bottom of the Layers panel. This makes the background transparent, leaving just the text shapes containing the texture from the original image.
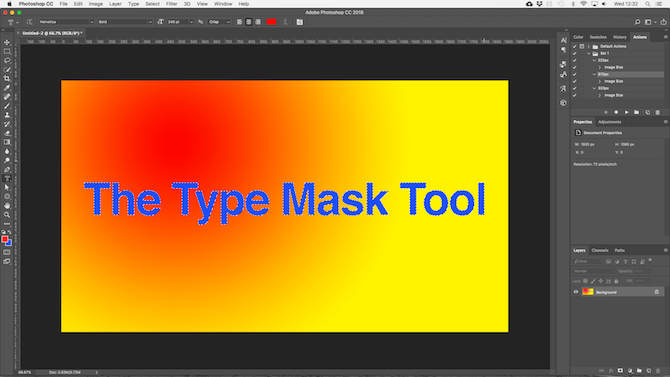
Fill the text with the background color. Hit Ctrl + Backspace or Cmd + Backspace to cut out the text and replace it with your currently selected background color.
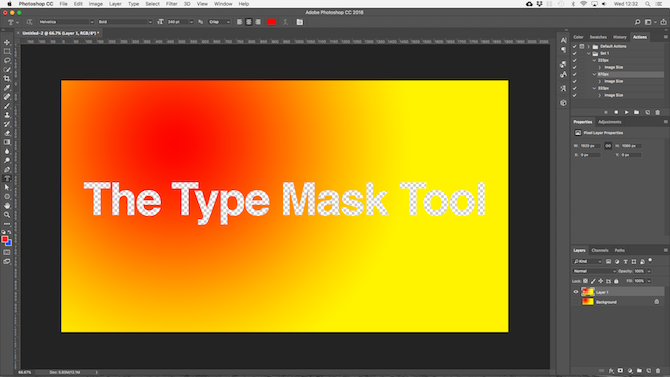
Cut out the text from the background. Hit Shift + Ctrl + I or Shift + Cmd + I to invert your selection. Now press Ctrl + J or Cmd + J. Hide the bottom layer and you’ll now have the original image with a transparent cut-out in the shape of your text.
Styling Text in Photoshop
Now that you know the main ways to get text onto your page, how do you go about styling it up? We’ve already looked at the basic settings in the Options Bar. There are a few more to know about, too.
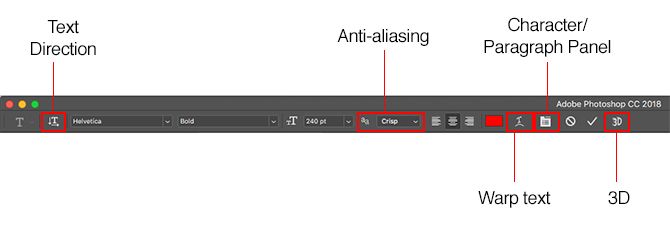
- Text Direction: Toggle between horizontal and vertical text
- Anti-aliasing: Set how crisp or smooth you want you text to look
- Warp text: Distort the text with 15 preset styles
- Open Character/Paragraph Panel: Open the panel for adjusting character settings
- 3D: Switch to Photoshop’s 3D view
As mentioned before, you need to select your text with the cursor before you can change its formatting.
The Character and Paragraph Panels
Click the Character and Paragraph Panel button in the Options Bar. The first tab contain a set of options for formatting characters. Some double up the options we’ve already seen (like choosing fonts and colors), while the rest enable you to finesse your type.
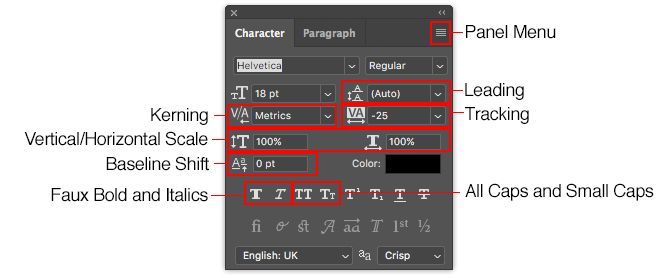
- Panel Menu: This includes No Break, which places a non-breaking space between two words to ensure they remain on the same line.
- Leading: This enables you to adjust the line height for your text. Leaving it set to Auto is usually good enough.
- Kerning: Sets the spacing between a pair of characters. Set the option to Metrics to use the default design for your font, or Optical to let Photoshop set it automatically.
- Tracking: Controls the spacing between all the characters in your text. Choose tighter tracking (a negative number) to add punch and urgency to your headers.
- Vertical Scale and Horizontal Scale: These options stretch or shrink your font vertically or horizontally. Only use them for specific design cases—if you need a wider or taller one, choose a different font.
- Baseline Shift: Moves selected characters above or below the baseline. Most commonly used for writing subscript or superscript characters.
- Faux Bold and Italics: Avoid these where possible—always use the Bold or Oblique versions of your chosen font, if you have them.
- All Caps and Small Caps: Automatically capitalize your text.
- Other Options: Various settings for creating sub and superscript characters, underlining, or control certain OpenType fonts.
Click the Paragraph tab to see the options for formatting the layout of larger chunks of text.
Here, you can indent the left or right margins of your text box, as well as choosing whether or not to use hyphenation.
Text Effects in Photoshop
Photoshop allows you to add effects to any layer, and this includes a text layer. It enables you to add a drop shadow that makes your text stand out against the background of your design, or perhaps to add a glowing effect.
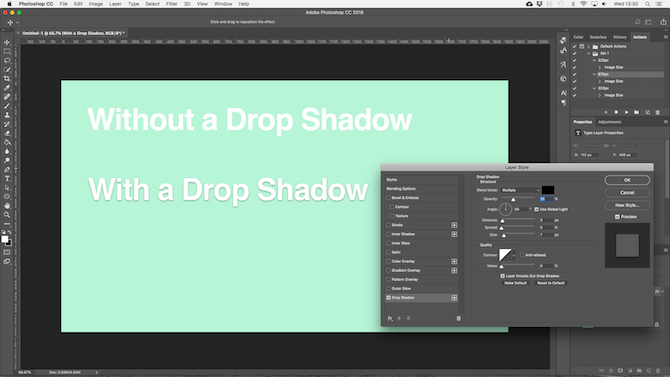
Double click the layer to open the Layer Style box.
Select Drop Shadow and adjust settings including Opacity, Angle, and Distance. Make sure the Preview button is checked, so you get a real time view of the effect. Click OK when you’re done.
The same approach lets you add an outer glow to the text, or apply a texture to the font.
Rotating or Skewing Text in Photoshop
To rotate or skew text select the text layer and hit Ctrl + T or Cmd + T to open the Free Transform Tool.
Hover the mouse pointer over the corner of the bounding box until the cursor turns into a curved arrow. Now click and drag to rotate.
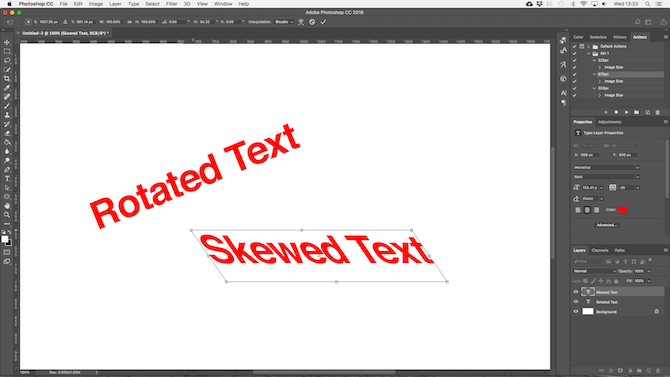
To skew the text, hold Shift + Ctrl or Shift + Cmd and grab one of the handlebars on the edge of the box. Drag sideways, then hit Enter to confirm.
Remember that too much skewing can distort your font.
Working With Fonts in Photoshop
Choosing the right font, or pair of fonts, is one of the most essential parts of graphic design.
Select fonts using the Fonts drop down in the Options Bar. You’ll see a small preview for each one.

Bookmark your favorite fonts by clicking the Star icon alongside them. To find them again hit the Star icon in the menu bar.
Select a font and choose Similar Fonts to browse through all your available typefaces with similar characteristics.
To increase your font choices click the Add fonts from Typekit icon in the Fonts drop down menu.

This launches Adobe’s Typekit website. Log in if you need to, then browse and select any fonts you want to add. Click the Sync All button to make all the styles of that font available in Photoshop. Alternatively, sync only the styles and weights that you need.
Matching Fonts From Other Images
Often you might have another image that contains a font you’d like to use, but don’t recognize. Photoshop’s Match Fonts tool can help to identify these mystery fonts, or at least offer up some similar alternatives.
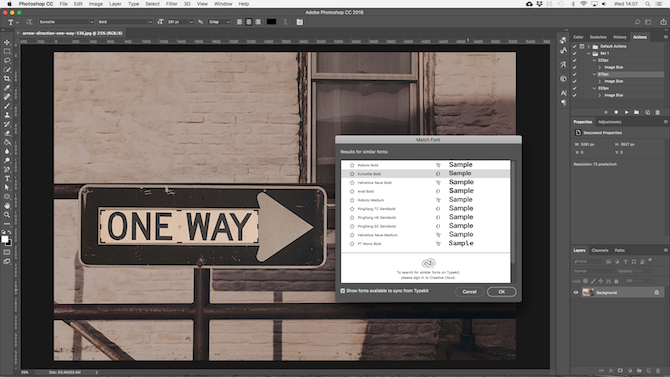
Open the image and go to Type > Match Font. The tool place an overlay on your canvas. Adjust the crop marks to highlight the font you want to match.
Some suggestions will be made after a few seconds. Pick one and click OK.
Tweaking a Font
When you’re designing a logo, a quick trick you can do to give it a unique spin is to tweak the font you’re using. You can do this easily in Photoshop.
Select the text and go to Type > Convert to Shape. This renders the text no longer editable.
Grab the Path Selection Tool (A) to select individual characters. You can now change their color, move, or rotate them independently of the rest of your text.
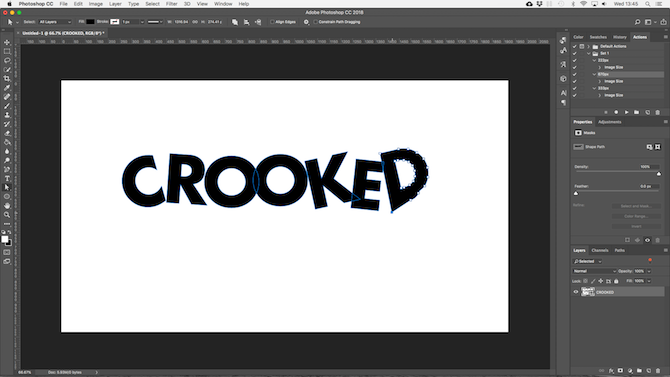
Use the Direct Selection Tool to show the path for each character. Drag the anchor points to tweak the look of the font, and you can even use the Pen Tool to add new curves to your letters.
What’s Next? More Photoshop Tips
Type is an integral part of graphic design, and Photoshop offers some pretty powerful tools for controlling how text looks on your page.
The next step is to learn how to incorporate it into the rest of your projects. Check out our guide to working with vector graphics in Photoshop and you’ll be well set to start creating icons, logos, posters, and a whole lot more.
from MakeUseOf https://ift.tt/2vKh7yZ
via IFTTT
0 comments:
Post a Comment