Adobe Illustrator is the best program for graphic design work; for pros and amateurs alike. But it’s so powerful it can be a pretty overwhelming experience. There’s so many things to do, and so many ways to do them, it’s hard to know where to begin.
The good news is that Illustrator has plenty of ways to simplify—or even automate—tasks that could otherwise be quite complex.
Here are several essential Adobe Illustrator tips and tricks that will help you design faster than ever.
1. Apply Multiple Strokes to an Object
Adobe Illustrator is a program that is built around vector objects that have a stroke (the outline) and a fill (the central color). If you’re relatively new to Illustrator, you might not realize that objects can have multiple strokes and fills.
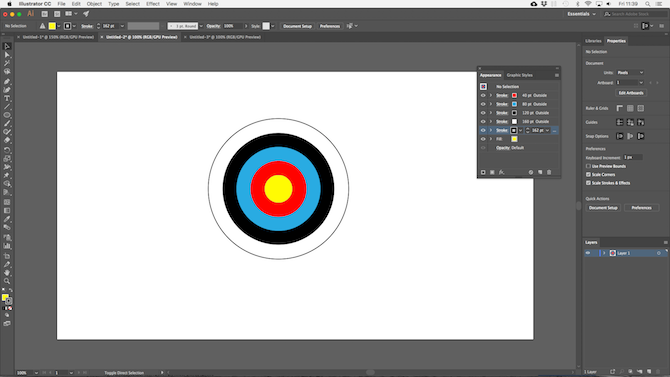
This target board image might look like it’s made from lots of different objects combined. In fact, it’s one object. A circle with a yellow fill, and red, blue, black, white, and black strokes.
Here’s how it was done:
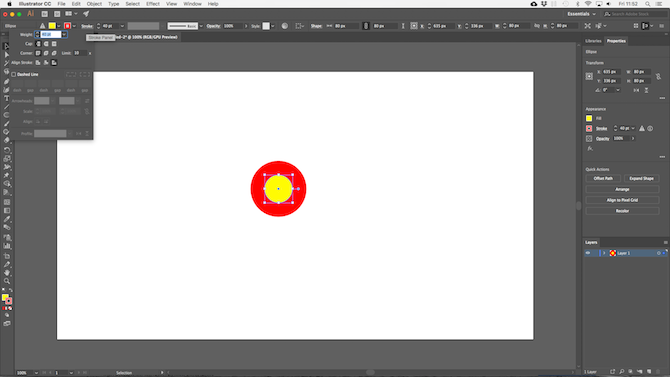
Draw the circle, 80px across. Set the fill to yellow, and the stroke to red with a 40pt width. Click the dotted line under the Stroke option and set Align Stroke to Align Stroke to Outside.
Now open the Appearance panel through the Window menu, or hit Shift + F6. Select the stroke and click Duplicate Selected Item. This creates a copy above the existing stroke.
Select the one below (we want the original stroke to be above) and set the color to blue and the size to 80pt. Then duplicate that.
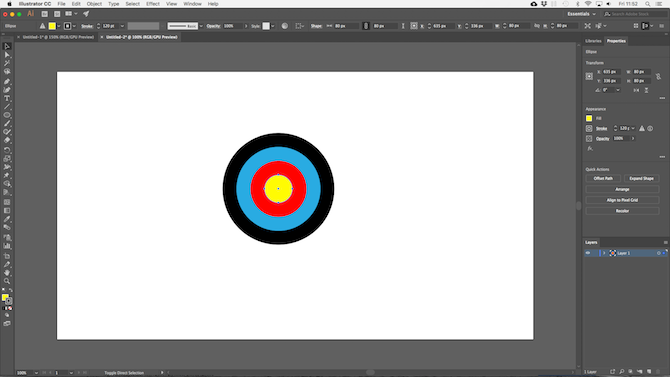
Repeat the process, changing the color and adding 40pt to the size of the stroke each time. For the final stroke, add just 2pt extra.

There are lots of other options. You can combine gradient and texture fills, add effects, change the opacity of elements, and more. You can also play with the order the strokes are placed on the image, to see the effect that has. Just drag and drop them into position.
Once you get used to the feature it becomes a whole lot easier than combining lots of elements to make relatively simple objects.
2. Make Patterns and Textures the Easy Way
Creating patterns and textures can be time consuming if you try to do it manually. The same job can be achieved in seconds if you learn how to use the Blend Tool.
With the Blend Tool you can repeat objects a set number of times, morph one shape into another, or create smooth gradients between different colors. And it’s really simple to master.

To get started, draw two objects on your canvas. Now double click the Blend Tool to open the options dialog box. Set Spacing to Specified Steps and enter the number of times you want the object to be duplicated.
The other options are Specified Distance, which sets the distance between each repeated object in pixels, and Smooth Color for smoothly blending between two colors.
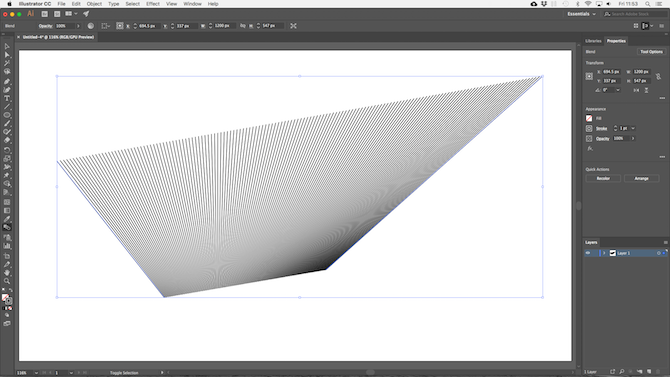
Click OK. Then, with the Blend Tool selected, click the first object on your canvas followed by the second. The gaps fill in automatically.
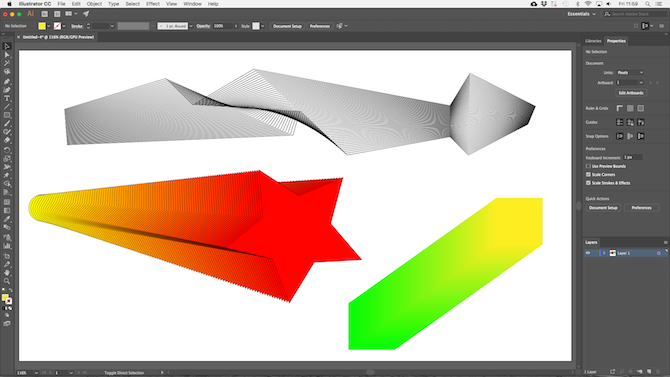
The Blend Tool works with almost any object, including text, with only a few exceptions. Try experimenting to see what you can achieve.
3. Hide Parts of Objects With Masks
Learning how to use masks can be a massive time saver. A clipping mask, as it’s called in Illustrator, is a shape that masks the object below it. Only the content that is positioned directly below the mask is visible. Everything else is hidden.
Masks let you combine patterns, textures, and gradients with shapes and text very quickly, and in a non-destructive way.
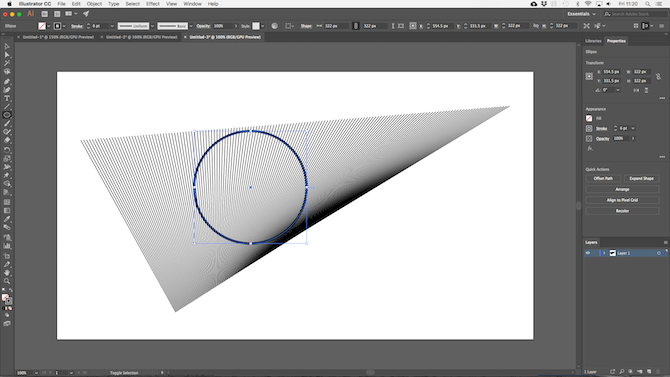
Start with the object you want to be masked, open on your canvas. Now draw a new shape on top of it. Make sure it’s on the same layer.
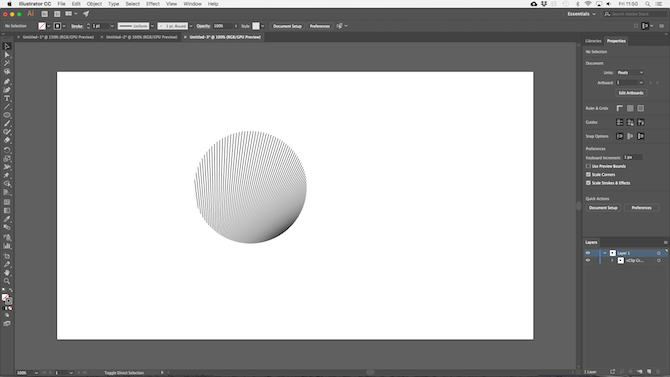
Use the Selection Tool to select both objects. In the Quick Actions panel on the right, click Make Clipping Mask.
You can reposition either the mask or the object being masked at any time.
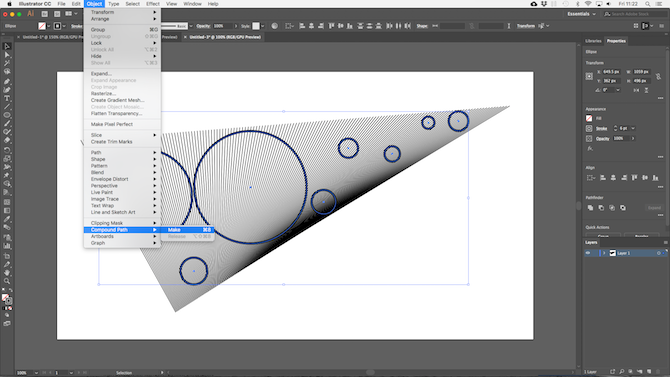
To create a mask from multiple objects you need to combine them first. Select all the objects you want to include then go to Object > Compound Path > Make. This turns them into a single shape.
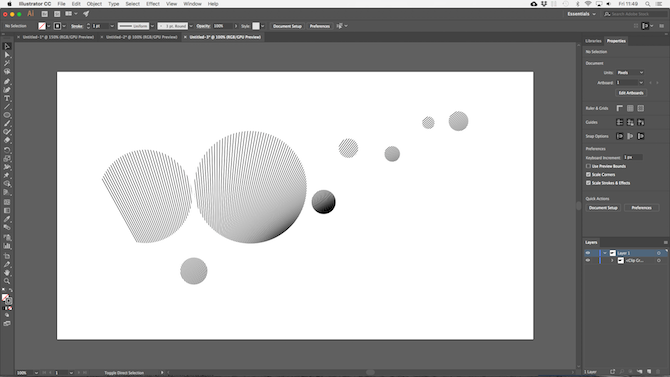
Select your new compound path plus the object below it. From the Quick Actions panel choose Make Clipping Mask to finish the job.
4. How to Create Complex Shapes
Shapes are an integral part of the Illustrator experience, but creating complex shapes has always been quite tricky. The problem has now been solved by the best of Illustrator’s more recent additions, the Shape Builder Tool.
The Shape Builder Tool works by dividing a group of selected objects into segments, wherever their lines cross. All you need to do is select which of those segments you want to include in your shape, and which you want to exclude.
Here’s simple example to explain.
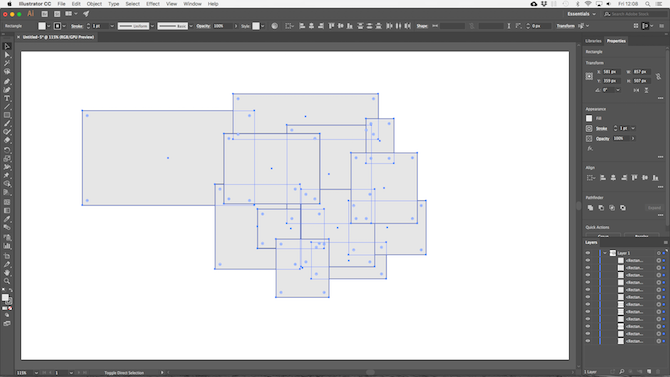
Draw a few shapes, then use the Selection Tool to select all of them.
Click the Shape Builder Tool.
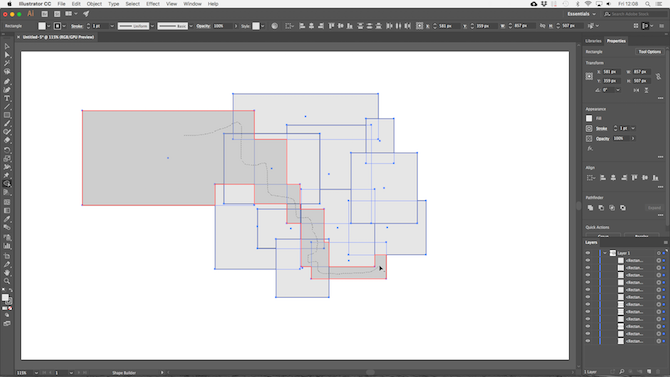
When you move your mouse pointer over the selected objects you’ll see each individual “segment” become shaded. Simply click and drag through all the ones you want to add to your shape.
You can create more than one complex shape from any group. Just click and drag as often as you need.
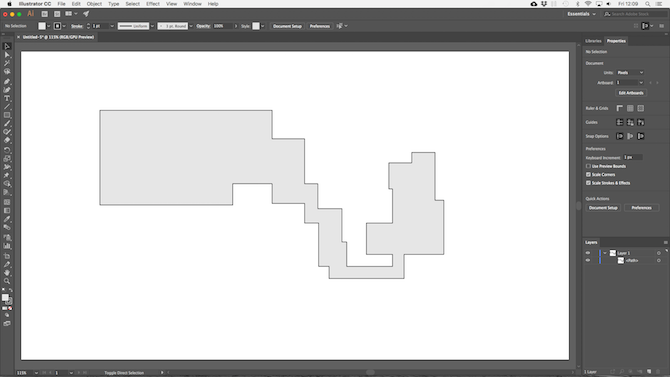
To discard segments you no longer need, hold Alt and click inside them.
5. Draw Shapes Freehand
An even quicker way to build shapes or objects is to draw them freehand.
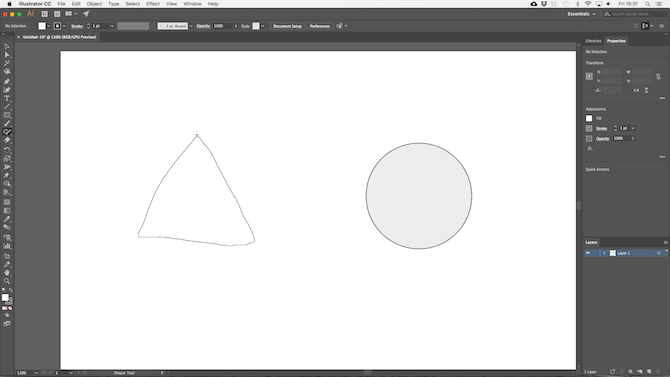
The Shaper Tool recognizes certain gestures. Draw a rough circle, rectangle, triangle, and so on, with your mouse or pen and Illustrator will convert them into perfect shapes.
But that’s not all. You can use the Shaper Tool to combine shapes using an additional “scribble” gesture:
- You can scribble inside a shape to remove its fill.
- Scribble inside, then cross over the stroke to delete the shape completely.
- Or scribble inside then draw a continuous line through connected shapes to combine them into a single shape.
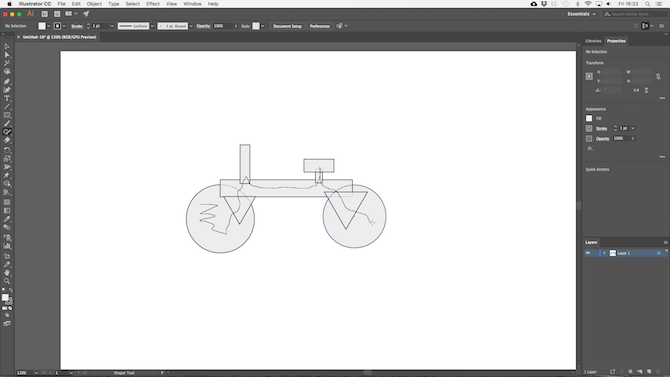
Although less precise than the other options available to you, the Shaper Tool is an effective way to get quality sketches down quickly. It’s particularly useful if you’re using a graphics tablet.
6. Draw Inside Shapes
Illustrator has three Draw modes that control where and how your tools can draw on the canvas. They’re found through a tiny button below the toolbar on the left edge of the screen.
The default setting is Draw Normal. This means you can draw anywhere on the canvas.
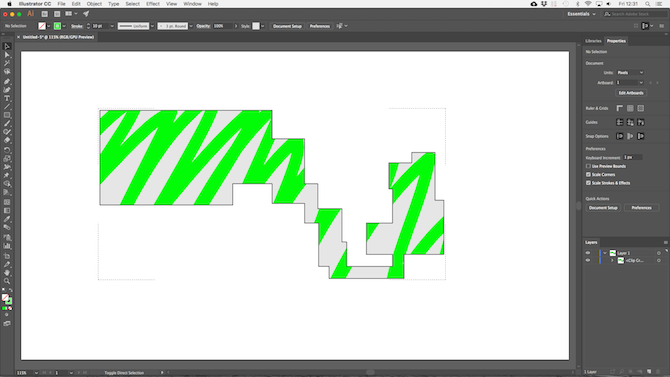
Select an object and set the Draw mode to Draw Inside. Now, anything you add to your image will only be visible if it’s within the bounds of that object. This is effectively a masking shortcut, and is very useful when working on icons, buttons, or small details.
The Draw Outside option has the opposite effect, and lets you isolate and protect certain parts of your image without needing to worry about re-ordering your layers.
7. Select Objects With the Same Properties
Say you want to drop the stroke on certain objects down by half a point, or change that shade of blue to something just slightly different. You grab the Selection tool, select all objects you want to edit, then make the changes, right?
Except when you’re working on large or complex documents, actually finding all instances of the same color, stroke weight, or whatever else, can be a challenge in itself.
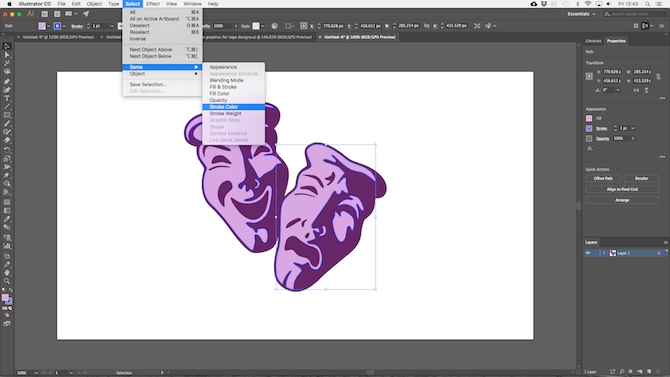
Fortunately, you don’t need to do it manually. The Same option will do it for you.
Select an object with the properties you’re looking for. Now go to Select > Same and choose the property you’re searching. It could be the Fill Color, Stroke Weight, Blending Mode, or several other options.
Once you click, all the objects that share those same properties will be selected.
8. Switch Colors Quickly
When you’re experimenting with colors or color schemes you will often find you need to change all instances of a single color within your image. You can do this quickly using the Recolor Artwork option.
First up, select the object whose color you want to change. It may be a single object. Or, use the Same option outlined in Step 8 to select all the objects containing the same fill or stroke color. Alternatively, hit Ctrl + A or Cmd + A to select everything on the page.
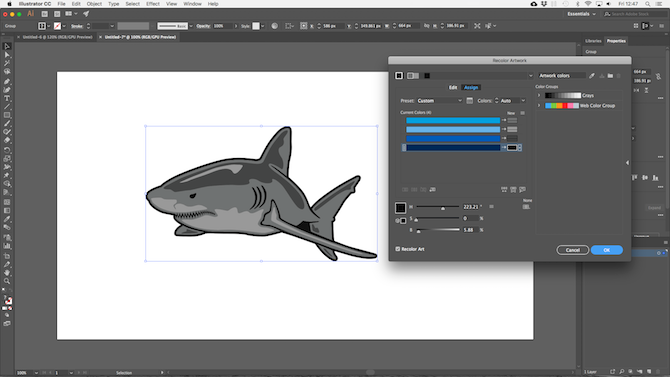
Next, click the Recolor Artwork button in the Options Bar at the top of the screen.
The color of your selected objects will be shown under Current Colors. Double click the box under New to select a new color to change them to.
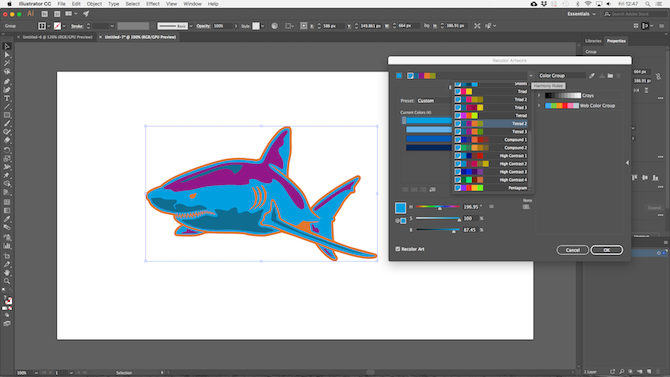
If you’re working with logos, web artwork, or the like, hit the Harmony Rules dropdown at the top of the window to see a range of preset color schemes based on your existing choices. The colors update in real time, so keep clicking through until you find a combination you like.
Now You Can Work Faster in Illustrator
As daunting as it may be at first, the more you know about Illustrator, the faster you’ll become at working in it.
These Adobe Illustrator tips and tricks should help you become a whole lot more efficient with the app, and you can then start using it for all your design projects. From creating logos to designing business cards, and much more.
And if you still feel like you need to get up to speed on what the program has to offer, check out our beginner’s guide to Adobe Illustrator.
from MakeUseOf https://ift.tt/2HwaPbX
via IFTTT
0 comments:
Post a Comment