Most Mac users go through a macOS update cycle around September each year. And while the novelty of the update is exciting, the process doesn’t always go smoothly.
To make sure your upgrade to macOS Catalina goes smoothly, think ahead and prepare your Mac for it. Here’s what you should do to get your Mac ready for the new OS update.
1. Make Sure Your Mac Is Compatible With macOS Catalina
First, you should check to see if your Mac can run the latest macOS update at all. The latest version of macOS, Catalina, is compatible with the following devices:
- MacBook (2015 and later)
- MacBook Air (2012 and later)
- MacBook Pro (2012 and later)
- Mac mini (2012 and later)
- iMac (2012 and later)
- iMac Pro (2017 and later)
- Mac Pro (2013 and later)
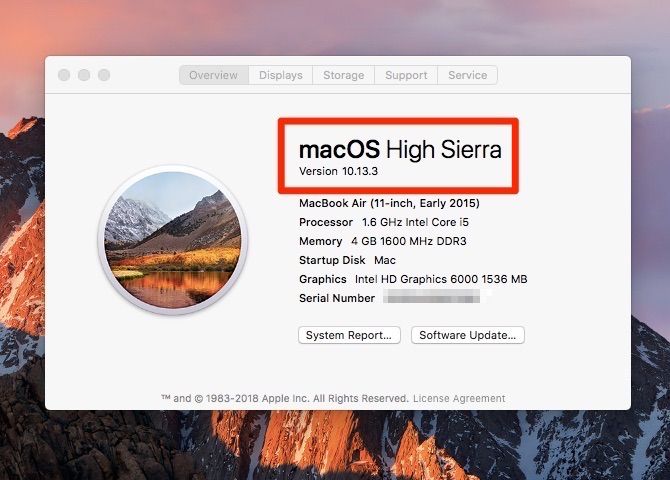
As a reminder, you can find your Mac’s model and year in the Apple menu > About This Mac.

While it probably won’t affect many people, there’s also a minimum version of the current OS you can upgrade from. Your machine must be running OS X 10.8 Mountain Lion or later to install macOS 10.15 Catalina.
2. Check If You Have 32-Bit Apps
Since Mac OS X 10.7 Lion, the Mac operating system has been 64-bit, but still supported 32-bit apps. With macOS Catalina, that’s no longer the case. While Apple is encouraging developers to update their 32-bit apps in order to remain compatible, some of your tools may stop working after this update.
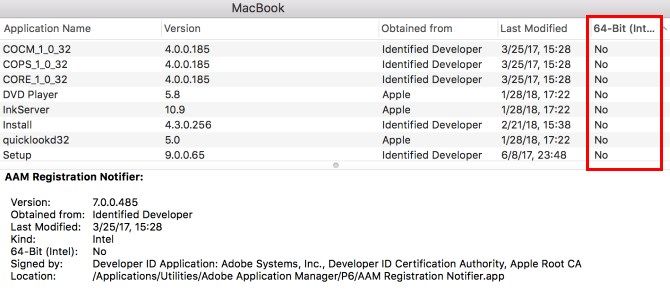
Here’s how to check which of your apps are 32-bit:
- Go to Apple menu > About This Mac.
- Click the System Report button.
- In the left-hand sidebar, scroll down to the Software category.
- Select Applications and wait for the list of apps to load.
- Click on the 64-Bit (Intel) column to sort the applications by whether or not they are 64-bit.

The apps with No in this column are still 32-bit and will be incompatible with macOS Catalina. You can either contact the developer and find out if they’re planning to update the app, or start looking for a 64-bit alternative.
If you heavily rely on any 32-bit apps, you may want to wait to upgrade until you have a plan to replace them.
3. Free Up Space for the macOS Update
To update to macOS Catalina, your computer must have at least 2GB of RAM and 15GB of available storage. Now, if you have a MacBook with a tiny amount of space, 15GB may sound like a lot. But you can free up space on your Mac without necessarily deleting important files and apps.
In macOS Sierra and later, the system will suggest ways to free up storage space. It provides easy access to the files and folders in question, so you don’t have to rummage around in Finder manually.
To access Optimized Storage on your Mac, go to Apple menu > About This Mac > Storage and click Manage.

Recommendations will differ depending on what you use your Mac for, but the most common suggestions for freeing up storage on your disk are:
- Clear the Downloads folder
- Delete old iPhone backups
- Remove app libraries you don’t use
- Empty the Trash
- Move your files to iCloud
If that’s still not enough, here are some macOS folders you can safely delete to recover even more storage.
4. Back Up Your Mac

Any major software update can go wrong. And even if it doesn’t, there are other reasons why you might want to return your Mac to its previous state. Maybe you start using the new macOS and encounter bugs and issues that hinder your workflow. Or perhaps you’ll find that your favorite software is not compatible with Catalina yet.
Whatever the case, you’ll want to have a complete and recent backup of your current macOS version and computer data so you can roll back. So make sure you back up your Mac before you start installing the macOS update.
How to Back Up Your Mac Using Time Machine
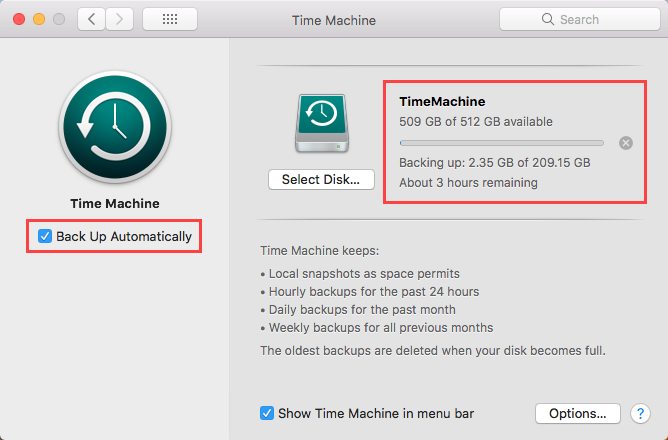
As you probably know, macOS comes with a native backup tool called Time Machine. It’s an easy choice for your pre-update backup. Here’s how to back up your Mac with Time Machine:
- Connect an external storage device like a USB or Thunderbolt drive, an AirPort Time Capsule, or similar. This Apple Support page lists the backup disks you can use with Time Machine.
- When you connect the drive, you might be prompted to use it as a Time Machine backup disk. If that doesn’t happen, go to Apple menu > System Preferences > Time Machine.
- Check the Back Up Automatically box.
- Click Select Backup Disk.
- Select the disk you want to use. If you want to protect the backup, check the box to Encrypt backups, though you should know that this will dramatically increase the time it takes. Finally, click Use Disk.
- After you set a backup disk, Time Machine starts automatically backing up your data without disrupting your workflow.
If you already had Time Machine backups set up, we’d recommend making a manual backup right before you install the new macOS. That way, you ensure no recent files were left behind.
To start a Time Machine backup manually, do the following:
- Click on the Time Machine icon in the menu bar.
- Select Back Up Now from the menu.
5. Have a Rollback Plan Handy

With a backup ready, you’ll be able to downgrade from macOS Catalina should the need arise. If you’re not familiar with the process yet, make sure you have the steps handy on your phone or another computer.
To downgrade from macOS Catalina using a Time Machine backup, do the following:
- Connect your Time Machine disk and restart or turn on your Mac.
- Immediately after powering it on, press and hold Cmd + R to start up from macOS Recovery.
- In the macOS Utilities window, select Restore From Time Machine Backup.
- Click Continue, and then Continue again.
- Select your Time Machine backup disk as the Restore Source and click Continue.
- Next, select the backup to restore from. This should be your most recent backup, which you made right before the upgrade. Again, click Continue.
- Select the destination disk for the contents of your backup (this will be your Mac’s hard drive).
- Now click Restore.
- When the restore process is finished, restart your Mac.
If you backed up your data using a different method, there are other ways to downgrade to a previous version of macOS.
6. Connect to Power and Stable Wi-Fi
This may seem obvious, but if you have a MacBook it’s an important consideration. Be sure to plug in your computer before you start, and connect to fast and stable Wi-Fi to download the macOS update.
You should allow at least 40 minutes to download and fully install macOS Catalina. Don’t plan any important tasks to do on your Mac afterwards, just in case the update goes wrong.
You’re All Set for the macOS Update
Now that you’ve prepared for the update, your Mac should be good to go. To install it, just open the App Store and you should see macOS Catalina prominently featured at the top. Click it to open its page and hit the Download button to begin the process.
Hopefully the process goes smoothly, and you can get to enjoying the new macOS right away. Since you’re updating the OS, why not take some time to update all the software on your Mac while you’re at it?
Read the full article: macOS Catalina Update: 6 Key Steps to Preparing Your Mac
from MakeUseOf https://ift.tt/2naZlkX
via IFTTT
0 comments:
Post a Comment