Forgetting your computer password isn’t fun. Thankfully, if you use a Microsoft account to sign into Windows 10, you can reset your password through Microsoft’s website and it’s relatively painless.
But it’s a different story with a local account. If you forget that, it’s a doable but tedious process to reset the password for a local account.
The latest April 2018 Update for Windows 10 adds a new feature that makes recovery a lot easier: security questions. Here’s how to set them up.
How to Add Security Questions to Windows 10

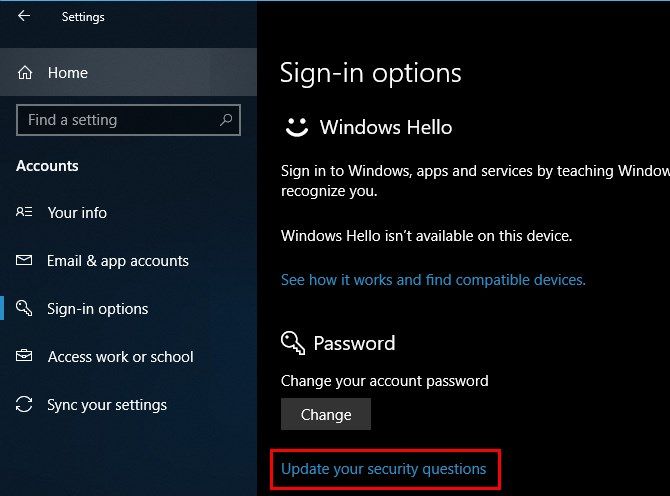
- Open Settings and navigate to Accounts > Sign-in options.
- Scroll down to the Password header. Under the Change button, you’ll see an Update your security questions link. Click this. (If you don’t see it, you’re using a Microsoft account to sign in.)
- Confirm your account password, then you’ll see three boxes where you can select a question and provide an answer.
- Choose your questions and answers wisely. You shouldn’t provide obvious answers to security questions.
- Once you’ve added an answer for all three, click Finish and enter an administrator password if needed.
Your security questions are ready to go once you’ve done this. To reset your password with them, look for a Reset password link that appears under the password entry box on the login screen. You’ll see it after you type an incorrect password.
Enter the correct answers for your three questions, and you’ll be able to reset your account password. If you use a Microsoft account, you can reset your password at the login screen using Microsoft’s utility instead.
We recommend that anyone using a local account adds these questions and notes their answers in a safe location. It’s a lot easier to reset your password with this than it is with workarounds, and it only takes a moment to set up.
from MakeUseOf https://ift.tt/2rjLIxT
via IFTTT
0 comments:
Post a Comment